Monday, April 28, 2008
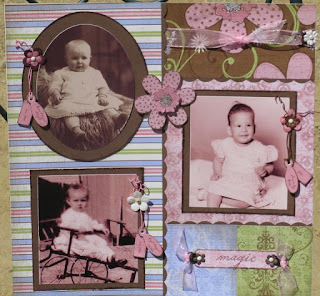
Something Old into something New
Wednesday, April 23, 2008
April's Monthly Workshop Layouts
Greetings once again from the Rubber Room!
 sed "Cherish's Dreamy Look" on page 52 for inspiration. The various techniques I used are:
Edge Distressing: Hold your paper of choice in one hand. In the other hand, hold your edge distresser so that the sharp edge is toward the paper. Scrape the edge distresser back and forth along the edge of the paper so the white core is exposed, as desired.
Fill with Embellishments: If you love a particular scrapbook page design but your photo is a bit small, simply attach your photo and then fill
Dimension with Pop Dots: For visual interest, add depth to your pages by mounting small images, tags, or photos on 3-D pop dots. They literally pop out from the page!
Wet Embossing: To emboss your image you will need a either a tinted embossing pad or Versamark pad and embossing powder. Ink up your image using the ink pad. Then sprinkle embossing powder over your stamped image. Tap off the excess. Pour the excess back into the container. Hold the heat gun 3 inches away from the paper and heat the powder.
Accenting with Ribbon: Color coordinating ribbons add bright 3-D flair to your pages. When used as a photo border, ribbons can "anchor" your picture and draw attention to your focal point.
Swiping Hold the ink pad in one hand and the paper in the other. Swipe the ink pad across the paper, as much or as little as desired. Repeat on sides and/or edges of the paper.
Random Stamping: Stamp one image in corner of your project. Add another stamping near it. When you add your 3rd stamp, make a triangle shape from the other 2 stamps. For stamp number 4, make another triangle from one side of the first triangle. Continue making "triangles" until you cover the paper. Forming triangles like this helps you space the stamped images evenly. Make sure as you fill your paper that you make some stamped images go off the edges of the paper. It adds to the continuity and makes it look more natural.
Thursday, April 10, 2008
Are you ready for some artwork?
Greetings once again from the rubber room!
The papers screamed "Retro" which makes me remember the 70s. Something I would really love to forget! LOL
Anyhow, I took these papers and pictures of my college life and this is what I came up with.
In the same plastic bag, I had two sheets of this crackle flowery paper. I loved it when I bought it, and was so afraid of cutting it. So I didn't. I trimmed around the flowers and built my layout from there.
This is my great grandmother, Gertrude Klock Archer. I don't have very many pictures of her. The calling card you see on the layout, I found when going through my father's things. There were 5 little one inch photos on the back. Down at the bottom of the layout, are two of those pictures.
Here is the tutorial to complete the flowers...the flowers are coming out a lot darker than in person. But it gives the layout some great dimension.
http://sbl.tvweekly.com/player.php?b9d77b8cc963127906325921a29dcebbw6570
And my last layout...this is my dad taken in October 1926. He was 7 years old at the time.

Thursday, April 3, 2008
Neverending Backlog
When this new year rolled around, my resolution was for every layout I do with new papers, I have to do a layout with some of the papers I have stashed away to be completed. I've been busy this past week working on past papers.
Unfortunately, I've run out of ink for my printer and I've run out of my tombows. So, now I have 8 layouts on my table waiting to be completed. Once the ink arrives, I'll be able to print out the pictures and journaling and when the tombows arrive, I'll be able to glue everything down.
The picture you see are all the projects I have waiting to be completed. Some are half finished projects, some are just ideas. But hopefully this year, I'll be able to get this cropper hopper of mine emptied out. Stay tuned for the finished projects, as I get them completed.
Wish me luck!
Till next time,
Happy Scrappin'
Leanne


