Greetings once again from the Rubber Room!
I thought I would share with you the layouts I just finished for my April Workshop. I used CTMH's Life Delights paper pack and Make it Count stamp set. I u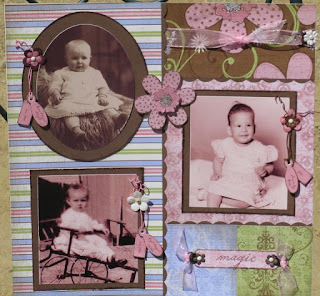 sed "Cherish's Dreamy Look" on page 52 for inspiration. The various techniques I used are:
 sed "Cherish's Dreamy Look" on page 52 for inspiration. The various techniques I used are:
Stamping: Press the stamp on the ink pad to ink the rubber image. Stamp on the paper, pressing firmly and evenly, being careful not to rock or slide. With many different colors of ink pads, one stamp can go a long way.
Edge Distressing: Hold your paper of choice in one hand. In the other hand, hold your edge distresser so that the sharp edge is toward the paper. Scrape the edge distresser back and forth along the edge of the paper so the white core is exposed, as desired.
Fill with Embellishments: If you love a particular scrapbook page design but your photo is a bit small, simply attach your photo and then fill
the space wit h embellishments. Make the concept
 h embellishments. Make the concept
 your own.
Dimension with Pop Dots: For visual interest, add depth to your pages by mounting small images, tags, or photos on 3-D pop dots. They literally pop out from the page!
Wet Embossing: To emboss your image you will need a either a tinted embossing pad or Versamark pad and embossing powder. Ink up your image using the ink pad. Then sprinkle embossing powder over your stamped image. Tap off the excess. Pour the excess back into the container. Hold the heat gun 3 inches away from the paper and heat the powder.
Accenting with Ribbon: Color coordinating ribbons add bright 3-D flair to your pages. When used as a photo border, ribbons can "anchor" your picture and draw attention to your focal point.
Swiping Hold the ink pad in one hand and the paper in the other. Swipe the ink pad across the paper, as much or as little as desired. Repeat on sides and/or edges of the paper.
Random Stamping: Stamp one image in corner of your project. Add another stamping near it. When you add your 3rd stamp, make a triangle shape from the other 2 stamps. For stamp number 4, make another triangle from one side of the first triangle. Continue making "triangles" until you cover the paper. Forming triangles like this helps you space the stamped images evenly. Make sure as you fill your paper that you make some stamped images go off the edges of the paper. It adds to the continuity and makes it look more natural.
Embossing Clear Inspirations Tags: Press the non-emboss side of the tag onto the watermark ink pad. Cover in white embossing powder. Heat untill powder melts. Repeat steps. Then chalk image etched into the front side of tag. Brush away excess chalk


No comments:
Post a Comment